Mini Property Sites & Reusable Sign Riders

Every Property you add for an Open House or Event Automatically includes Beautiful Mini Property Sites in three different styles.
These Sites and other details are all managed on the Properties / Flyers / Visitors page.

Easily create re-useable Sign Riders for any property with just a click or two.

To see the Full Specifications and Property Site Demos, Checkout the Property Sites & Sign Riders Overview page.
Checkout the (3) Property Site Styles – Watch Video

Open House Wizard – Property Site & Rider Code Creation. – Watch Video

Overview
The Mini Property sites are automatically created once a Property is added for an Open House or Event. There are three different styles created so you can choose to use whichever one you think looks best for your purposes. These sites not only look great but they are designed from the ground up to generate Agents some serious leads.
Step by Guides to using Property Sites and Reusable Sign Riders
Adding and Managing Rider Codes
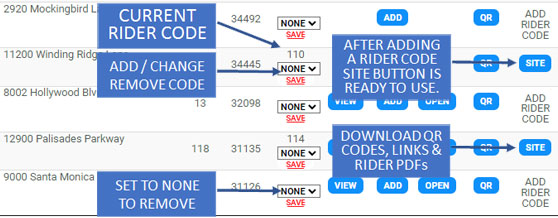
- The first step is to assign a property a ‘Rider Code’
- To do this, open the Properties page and select a Rider Code from the dropdown menu on a Property as shown below
- Save the Rider Code and it will now be assigned to the Property
- To remove a Rider Code just choose NONE, then Save
- To switch a Rider Code from one Property to another:
- Select NONE on the 1st Property then Save to remove the code from the property
- Then on the 2nd Property, choose the Rider Code on the dropdown menu and click Save
The Property Sites & QR Codes Screen
After adding a Rider Code to a Property you will now see a button named SITE on your Property’s row.
This SITE button opens the Property Site Links & QR Codes screen for your Property.
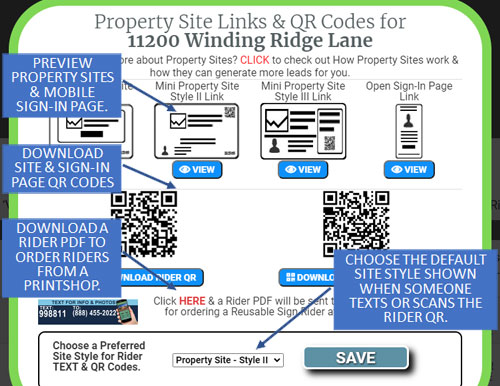
Things you can do on the Property Sites & QR Codes Screen
- View each of the (3) Mini Property Sites (and copy the url for posting on Social Media)
- View the Smartphone Open House Sign-In page
- Download Property Site or Sign-In page QR Codes
- Download a Sign Rider PDF file to use for ordering Sign Riders from a print shop
- Set the Preferred Mini Property Site style you would like as your default style (otherwise, Style 1 is the default)
Posting Mini Property Sites to Social Media or using in an Online Ad Facebook and Twitter examples.


Promote Property Sites on Social Media to Generate Leads (Twitter and Facebook example) – Watch Video

Step by Step Guide to Posting a Property Site on Social Media
- After adding a Rider Code to a Property as outlined previously, Click the SITE button on the Properties page for the Property you would like to promote
- On the Property Sites and QR Codes Screen click the VIEW button for the Property Site Style you want to post
- The Property Site will open and there you can copy the site’s url for posting on Social Media
- Now go to your Facebook, Twitter or other social media page and create a new Post and paste the url for the Property Site
- Add anything else you would like on the post then Save
- Or an alternative way to do this:
- After clicking the VIEW button mentioned above and the property site is open, use the Social Media Sharing icons on the site to post or share the Mini Site
Order a Reusable Sign Rider from a Print Shop
The example Video below uses the SignsontheCheap.com online Print Shop to order a rider.

Step by Step Guide to Order a Sign Rider from an Online Print Shop
(See video above for these steps as well)
- After adding a Rider Code to a Property as outlined previously, Click the SITE button on the Properties page for the Property you would like to promote
- On the Property Sites and QR Codes Screen click next to the Rider image to Download a Rider PDF for the Property
- Choose a TEXT only or TEXT & QR Code Rider & it will be sent to your email
- After receiving the email, save the Rider PDF for later
- Now, go to your online Print Shop and start the process to order a Rider
- Here are the steps to do this at the SignsontheCheap.com online Print Shop:
- 1st open the ‘Signsonthecheap.com’ website
- Choose ‘Design Your Sign’ at the top left
- Choose Aluminum or Plastic *I’d use aluminum which is more durable but can also support holes at top and bottom so the Rider can hang
- Click ‘Make my Sign Double Sided’
- Choose 6″ x 24″ *Kind of a standard Rider size, but choose differently if you need a shorter one
- Choose Quantity *I’d choose ‘1’ since these are Reusable Riders, ‘2’ if you want a backup Rider in case a Rider is stolen or lost
- Click ‘Upload a Full Design’
- Then Click the ‘Design Your Sign’ button and the Upload Image screen will show
- Click Browse and choose your Saved PDF from earlier then click ‘Upload Image’
- Drag the right-hand bottom corner to resize the image to the work area making sure it covers it entirely
- To make sure it is looking right, click the ‘View a Large Proof’ button
- If all looks good, close the View Proof popup and click ‘Save and Continue’
- You can make any final adjustments on the next screen *This is where you can also add the ‘Frame Holes’ if you need a hanging Rider
- Click Add to Cart
- Checkout and that’s it!
Remember you can manage your Reusable Rider Codes and move them from property to property as needed by using the instructions previously in the ‘Adding and Managing Rider Codes’ section above.