Common settings to setup & consider using
While you can pretty much use Open House Wizard without having to do much setup at all, there are some common settings that it may be worthwhile to know about.
Most settings are located under the settings Tab (of course) as well as a few other Tabs.
Here are the most commonly used and important settings:
- Your Details
- Questions & Settings
- Your Account & Billing
- Images, Colors & Fonts
- The Welcome Email
The ‘YOUR DETAILS’ Tab

- Make sure your information (Email, Phone, Company name, website) is all there and correct
- The ‘Open Street Address’ field –
- Normally you do not need to use this field because when a flyer is created it will add the open address here automatically
- If using the ‘Quick Flyer’, then adding the Open Address here will link the visitors to the correct address.
- Not needed if using our Advanced Flyers
- The ‘CRM’ Tag Fields
- If using a CRM the Open Address will be used as a Tag #1 and Tag #2 can be whatever you need it to be
The ‘QUESTIONS & SETTINGS’ Tab

- Enable or Disable optional questions such as ‘Timeframe to Buy’
- Enable or Disable the ‘Working with an Agent’ question
- Add up to two custom questions (can be set as a Yes/No question also)
- Require or not require email and phone
- Enable / disable Feedback (Shows a ‘Leave Feedback’ button after a Visitor registers on their Smartphone)
- Add a 2nd email to copy leads to
- Allow or disallow the Team Leader from viewing your visitor leads
The ‘YOUR ACCOUNT’ Tab

- Access your Billing info to change payment type etc.
- Change your password
- Download your personal QRCODE and Text Sign-in code to create your own flyer
The ‘BRANDING’ / IMAGES, FONTS & COLORS Tabs

- Upload your main image or Headshot
- Set your own font styles and colors
The ‘Welcome Email’ & ‘Text Messaging’ Tabs

Welcome Email Settings:
- Visitors receive it as soon as they register (Can be a Text also with our Text add-on)
- Add your own welcome message
- Change the color scheme
- Add up to 3 attachments
- Add an image
Text Message Settings *requires the Text add-on
- Add your own visitor message that Visitors receive upon registration
- Add an image
Setting up a Team & Managing Team members

Whether your Team is 2 persons or 200, the setup is very easy to do!
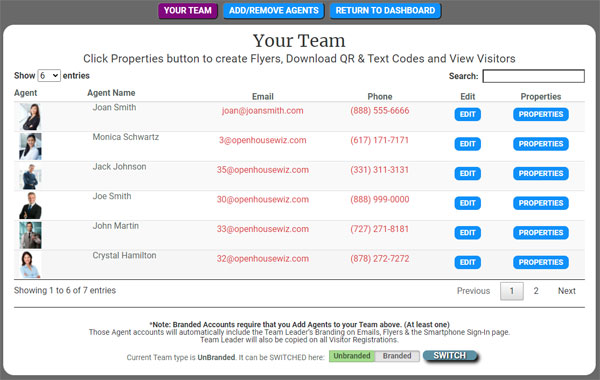
- The 1st place to go is the ‘MANAGE TEAM’ Tab.
- Here you can add/remove/edit Team members and their main settings including Headshots etc.
- Add/view their Opens/Properties or Events as well as the Visitor details.
- You can even create a Flyer for any agent on your Team here as well.
Steps by step guides for the ‘MANAGE TEAM’ Tab:
Add or Remove an Agent Team Member
- Click the ADD/REMOVE AGENTS button at the top of the page
- If an existing Open House Wizard Subscriber, type in their email address
- If new add their Email and Name then Click Submit.
- They will be sent an ‘Invitation’ email to setup their password and account.
- To remove an Agent simply click REMOVE next to the agent’s name
Edit an Existing Agent’s Info
- Click EDIT on the Agent’s row
- Add their info and images
- Click SUBMIT to save
View or Add an Agent’s Properties (Opens or Events)
- Click PROPERTIES on the Agent’s row
- Then you can view the existing properties
- Click the ADD A PROPERTY to add one for the Agent
View or Edit an Agent’s Visitor Leads
- Click PROPERTIES on the Agent’s row
- Then you can view Visitors (if any) by clicking the VIEW button on a property
- From there you can view each individual lead or edit them by clicking the EDIT button
Add a QRCODE / Text Flyer for an Agent
- Click PROPERTIES on the Agent’s row
- Click the FLYER button
- Add images if they are not there by clicking the ADD OR CHANGE FLYER IMAGES BUTTON
- Add all neccessary info such as the Open House date etc.
- Click CREATE FLYER (it will be emailed to you)
Open House Wizard Team Branding
Team Branding for Mortgage Professionals & Teams.
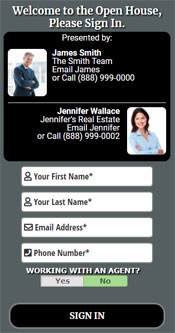 Our Team Branding Service allows the Team Owner’s branding and contact info to be automatically displayed to Visitors at Open Houses. The dual branding contains the Real Estate Agent Team Member or Partner’s branding alongside the Team Owner or Broker’s branding. This branding is in place on the Smartphone Visitor Registration page, the QRCODE / TEXT Flyers and the Welcome to the Open House email to name a few places.
Visitor registration details are sent ‘Live’ as they occur to the hosting Agent as well as the Team Owner. They can also be sent to a CRM of choice.
For Loan Pros who partner with Real Estate Agents this service can provide a valuable service for their partner agents as well as help them grow their own business at the same time.
Let’s look at how you can use the Team Branding service…

Offer a Valuable Service to your Agent Partners
Not only will the Team Branding Service help you grow your own business it will also help your agent partners grow their own at the same time.
How to do this:
- Fully add your branding to your own account including full contact info, main image or headshot and a logo. *If using a CRM, request the connection under ADVANCED/CRM
- Offer your agent partners slots on your ‘Team’ by adding them as Team Members.
- To do this click the MANAGE TEAM tab (or view our help article on Setting up and Managing Team Members)
- There you can ‘invite’ Agents to your Team or even import them from a CSV file.
- Each Agent will receive their own full Open House Wizard account with the exception that the Team Owner’s branding will be shown alongside their own.
- The Welcome to the Open email, the QRCODE Text Flyers and the Smartphone sign-in page and more will be automatically branded.
- Agents and the Team Owner are copied on Visitor Sign-In details ‘Live’ as they occur.
NOTE: You can switch your Team type from ‘UNBRANDED’ to ‘BRANDED’ (or vice versa) at the bottom of the MANAGE TEAM page.
Getting Started with Team BrandingDemo walkthrough from the Team ‘Leader’ perspective. |
Getting Started with Team BrandingDemo walkthrough from the Agent ‘Partner’ perspective. |
|
|
|


Creating a ‘QUICK FLYER’

The Quick Flyer is meant for those in a hurry or who need a Flyer they can just print once and use at very different Open House.
To create a Quick Flyer
- Click the QUICK FLYER Tab
- Choose a Half page or Full page flyer *The Half page only uses your headshot or main image and logo, the Full page uses those &o 3 property images
- Add the Open Date and any comments about the open, the address, price and click CREATE FLYER
NOTE: If using the same Flyer over and over without reprinting, make sure to update the Open House Address under the SETTINGS/YOUR DETAILS Tabs. This way the Visitors will show up on the correct property address when you view them.
Using ‘Advanced Flyers’

‘Advanced Flyers’ allow for more design choices and additional information about the Property or Event. They can be found under the PROPERTIES, FLYERS & VISITORS Tab.
Advanced Flyers are added to a property automatically when created. The advantage here is that the flyer settings and images are saved with the property settings which allow agents to quickly reprint or change existing flyers without having to re-enter all information. So they can be quite a time saver!
To Create or edit an Advanced Flyer:
- Open the PROPERTIES, FLYERS & VISITORS Tab
- To create or Edit a Flyer choose ADD under the ADD A FLYER column. *If the property does not yet exist, 1st add it using the ADD A PROPERTY buttons.
- If a Flyer was previously saved for the property you can then edit the property
- If this is the 1st flyer for the property:
- Add images using the ADD or CHANGE FLYER IMAGES Button
- Choose a flyer design
- Add the information for the Open House *Try to add all the info shown, the flyers look best this way
- Click the CREATE FLYER button (The flyer will be emailed to you)
- To recreate a previous flyer, click the OPEN button under the View Last Flyer column *If a flyer was created previously for this property the button will show there
The Properties, Opens / Events, Flyers & Visitors Page
Manage them in one Place
Here you can Add, Edit & Remove Properties. Properties, Opens & Events all have a street address in common and are identified by the street address. The Properties can contain & store lots of important information such as the Open House Visitors that registered there.
Flyer Images and Settings can be stored within the Property information as well. This means that if you ever want to reprint a Flyer for a Property, the information and images will already be there.
Let’s look at how you can use the Properties page… The Main page
Here you will see all of your property addresses you have entered in the recent past.
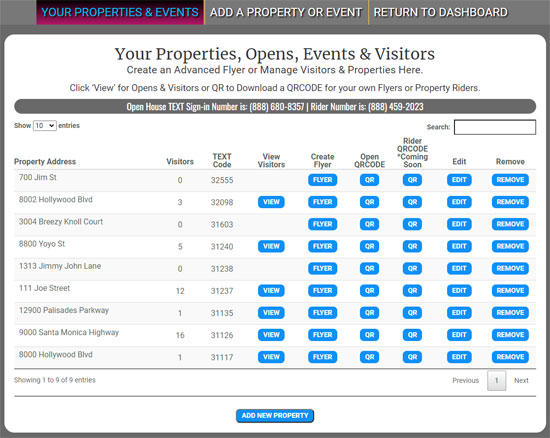
Besides the property addresses the page shows the following information:
- The number of registered visitors for each property/open/event.
- A ‘TEXT Code’ for Visitor Registration for the property. This can be used on your own flyers, riders, websites, emails or anywhere.
- At the top of the screen are two toll free numbers used for TEXT Codes, one is used for Open House Visitor Registration and the other will be used for Property Info or Showcase pages. * Coming Soon!
- View buttons will appear if there are registered visitors for a property. They allow you to view, edit and manage the visitors.
- The Flyer button does just that, it will create an Open House Flyer just for that property.
- The Open QRCODE, can be used to create your own flyers & display to allow visitors to scan and register for an open house or event.
- The Rider QRCODE, can be used on a Rider or other marketing material and will display a property info / showcase page on a Visitor’s smartphone.
- Last, you can Edit or Remove each property here as well.
The View (Visitors) page
Here you will see all of your registered visitors for the property.
The page shows the following information:
- The number of registered visitors for each property.
- The main Visitor info, Open Date, Name, Phone and whether they have an agent or not.
- The View button will allow you to view all of a Visitor’s recorded details.
- The Edit button allows you to edit a visitor’s information or to add notes.
- The remove button will delete the visitor.
The View a Visitor page
- Here you will see all of the recorded details for a registered visitor for the property.
- You can also edit the details of the Visitor and add notes.
The Create a Flyer page
Here you can generate a beautiful QRCODE / TEXT Flyer for the property with just a few clicks.
To Create a Flyer follow these steps:
- Click the FLYER button on the Create Flyer column
- Add Images for the Flyer if you have not already done so. *These images will also save with the property so if you ever need to reprint a flyer they will already be in place.
- Choose a Flyer design.
*Click the VIEW FLYER DESIGNS button to see what designs are available. Make note of what is needed for the different flyer designs. Some require bedrooms, bathrooms and other information to be added on the form. - Make sure all fields are filled out since the Flyer looks its best with no information missing which will cause blank ‘boxes’ on the flyer.
- Click Create Flyer. The Flyer will be delivered to your email address.
Download Property QR Codes to Create your own Flyer or Property Rider
To download and use:
- Click the QR button
- Right-click the QRCODE itself and download it. *On Apple, hold down your finger on the QRCODE and then save from the menu.
- Add it to your own flyer or other marketing
- The Texting number is also shown here to use on your own flyer
Getting Started with Signed PDF Disclosures
 Getting Started with the Signed PDF Disclosures Add-on
*Works with the Smartphone Registration page
Let’s run through the steps with a few of the options you have available.
1st of all if you do not need Visitor signatures on the PDF itself, you do not need the Signed PDFs Add-on, you can simply add disclosures on the Smartphone Settings page that the visitors has to agree to and sign the page before registering for your Open House. The Smartphone Settings page is located on the Dashboard under ‘Your Settings’.
To get started with Signed PDFs
- Order the Signed PDF Disclosures Add-on on the Pricing page – https://openhousewiz.com/storew/
- You will be sent to an information form after ordering where you can upload your disclosure(s) and any instructions to support about the specifics of how they should be signed. (if any)
- Open House Wizard support staff will setup the signed PDF and add it to your account
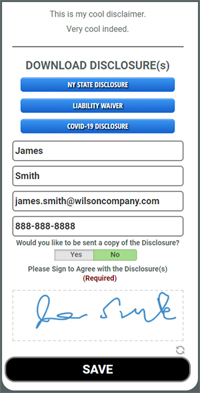
- When using the Smartphone Visitor Registration page where a QRCODE is scanned or a Text code is sent by the Visitor, the Visitor will be presented with a Disclosure page that needs to be signed before they can register for the Open House.
- Visitors can also opt to receive a copy of the signed pdf that will then be automatically emailed to them
- Agents can also opt to receive copies of signed PDFs as well
Smartphone page Settings & Disclosures

Smartphone settings allow you to customize some aspects of the Smartphone (mobile) registration page that visitors see after Texting or Scanning a QRCODE to sign in.
The main two things here are that you can customize the Thank You page settings (seen after a visitor registers) and whether to require a Disclosure be signed before a visitor can register.
To Add / Change the Thank You page:
- Click the SMARTPHONE & DISCLOSURES Tab
- Click ENABLE on Custom Thank You page settings
- Add a thanks your message
- Add up to 3 files and/or Links for Visitors to see
To Add / Change Disclosures
- Click the SMARTPHONE & DISCLOSURES Tab
- Click Enable Disclosures
- Add a disclosure in the Text box or add up to 3 disclosures for visitors to download and view
For Signed PDFs, see our Help page Getting Started with Signed PDFs
View Visitors

View all Visitors that have registered for any Open House you have held.
You can also view Visitors during the Open House by logging into your Open House Wizard account on a Smartphone.
To View Visitors on the Dashboard:
- Click the VIEW VISITORS Tab
- All Registered Visitors will show
- Here you can also:
- Edit Visitor Details
- Add Feedback or Notes
Lookup Visitors in a Security App
To Lookup a Visitor in a Security App (such as Forewarn)

- Click the VIEW VISITORS Tab or Login to Open House Wizard on a Smartphone
- Click to copy Visitor’s phone number to look them up in a Security App
- Switch to the security app and paste the Visitor’s phone number
Drip Campaigns (Can be setup with one click!)

Add up to 7 Drip Emails or Texts that Visitors will receive from you after registering
*For text the Text Add-on is needed
To Add and Setup your Drips
- Click the MARKETING / DRIP CAMPAIGNS Tab
- Enable or Disable All Drips with one click (our default drip emails will be used)
- Or customize each drip and enable as many or few as you wish
- To test the drips, click the Test All Drips item
To Manage / Cancel Running Drip Campaigns

- Click the DRIP STATUS Tab
- Click the ID next to the drip you would like to cancel or restart
- Choose Cancel or Restart from the drop down menu
NOTE: Visitors can opt out of the drip campaign by clicking Unsubscribe at the bottom of a drip email
Visitor Feedback & Feedback Reports
You can collect Visitor feedback during the Open House then generate a nice Feedback report afterwards.
To Enable Feedback & Collect Feedback

- Click the SETTINGS / QUESTIONS & SETTINGS Tab
- Click YES on Enable or Disable Feedback
- Click the SAVE Button
- To collect Feedback: (3 ways)
- If using a ‘Classic’ Sign-in page, Visitors can click the Feedback button on the page
- If using a Flyer, Visitors can click the Add Feedback button on the Thank You page they see after registration
- If you want to add it yourself:
- Login to Open House Wiz on your Smartphone
- Click the FEEDBACK button next to a Visitor’s name
- Click the UPDATE button

Generate a Feedback Report
- Click the ADVANCED / FEEDBACK REPORTS Tab
- Add a message that will show at the top of the report
- Choose the button that matches the Day of the Open House
- Click ‘Open House Wizard PDF Report’ to download a PDF
Connect to a CRM

We can connection with up to 1500 different CRMs and Lead Services.
To connect your CRM:
- Click the ADVANCED / CRM Tab
- Choose your CRM from the list and add your connection details and Save
- Support will notify you once the connection is setup
NOTE: If your CRM is not listed, choose ‘Not in the List Below’ from the dropdown menu at the top of the page and add your requested CRM name then click the REQUEST CONNECTION button.
Using the Coop Partners Service

If you partner with other agents, you can add them as ‘Virtual Coop Partners’, then ‘Activate’ them before an Open House. The Coop partner’s branding will show alongside your own and they will be copied on Visitor Leads. (If you permit it)
To get started:
- Click the ADVANCED / COOP PARTNERS Tab
- Add your COOP Agent(s) and their basic info and images
- Activate the Agent before an Open House by clicking the button in the ACTIVATE YN column
- To Deactivate an Agent click the button in the ACTIVATE YN column (If active it should say ‘YES’)
NOTE: An activated agent will stay activated until they are deactivated